How to browse iPortal maps by iClient for JavaScript 8C API |
SuperMap iClient 8C for JavaScript provides API to browse the maps in SuperMap iPortal, which helps you create a iPortal map on Web page.
The following provide two examples, which helps you understand how to use JavaScript API to browse the iPortal maps.
In Getting started with iClient for JavaScript 8C, we've learnt how to use SuperMap iClient 8C to build a simple map application to access SuperMap iServer maps. Here we introduce how to browse a public map in SuperMap iPortal.
Download the SuperMap iClient 8C for JavaScript package, and unzip the package to the local disk. Download address: http://support.supermap.com.cn/product/iClient.aspx
Create a new folder in a disk and named as "MyFirst"; In the "MyFirst” folder, create a "iPortal_MapViewer.html page with a text editor (such as NotePad++) . And save the html to UTF-8 encoding. Add the following codes to it:
<!DOCTYPE html>
<html>
<head lang="en">
    <meta charset="UTF-8">
    <title></title>
    <style>
        .mapcontainer{
            height:600px;
        }
        #urlInput{
            width:300px;
        }
    </style>

    <script src = 'libs/SuperMap.Include.js'></script>
<body>
<label>Input iPortal address:<input id="urlInput"
 type="text" placeholder="http://<service>:<port>/iportal"
 /></label>
<br/>
<label>Input MapID:<input id="mapidInput"
 type="text" placeholder="1"
 /></label>
<br/>
<button onclick="selectMap()">Open map</button>
<div id="map" class="mapcontainer"></div>
<script>
    //iPortal map browse API function
    var urlInput=document.getElementById("urlInput");//Input iPortal address
    var mapidInput=document.getElementById("mapidInput");//Input the map id
    var viewer;
    function selectMap(){
        if(viewer){
            viewer.destroy();
        }
        var
 url=urlInput.value;//Get the iPortal address
        var
 mapid=mapidInput.value;//Get the map id
        viewer=new
 SuperMap.Cloud.MapViewer(url,"map");//According to the iPortal address and map id, browse a public iPortal map
        viewer.previewMapById(mapid);//Create the map according to the map id
    }
</script>
</body>
</html>
Copy the libs and theme folders to the "MyFirst" folder. You can also put them to other places by modify relative path of the reference script.
Copy the "MyFirst" folder to the directory of %SuperMap iPortal_HOME%/webapps to publish the example. Start SuperMap iPortal and input: http://192.168.120.40:8090/MyFirst/iPortal_MapViewer.html to access it.
You can also copy the "MyFirst" folder to other middlewares (such as Tomcat), or SuperMap iServers or other iPortals to publish it. Start the corresponding middleware and input: http://ip:port/MyFirst/iPortal_MapViewer.html ("ip" and "port" is the ip and port number of the corresponding middleware) to access it. No need to reboot the middleware service if it's already started.
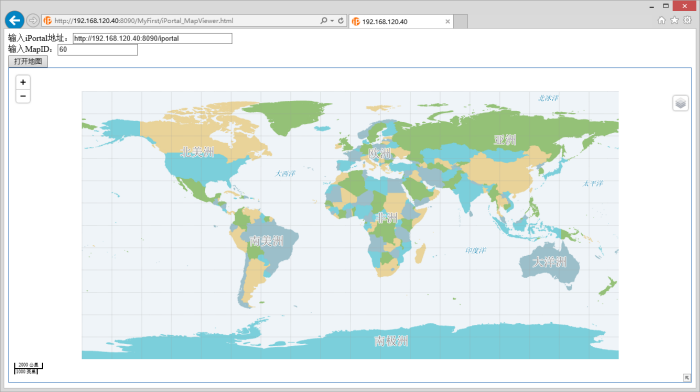
Input the iPortal address (It needs to be the same with IP in the address toolbox, that is, if the address bar is IP, here it should be IP; If the address bar is localhost, here it should be localhost) For example, http://192.168.120.40:8090/iportal, then input map id. For example: 60, and click Open Map button to browse the iPortal public map.
Please refer to: iClient for JavaScript 8C ->"SuperMap.Cloud.MapViewer" for more information.
The maps in SuperMap iPortal have the access permissions. For the non-public map, only the users who have the access permission can access it after logging iPortal. The following is a simple example to log in to iPortal. After logging successfully, use the same browser to access the "iPortal_MapViewer.html" page published in Example 1. Input iPortal address and map id, and click Open Map button to browse the maps which have access control in iPortal.
Based on Example 1, create a "iPortalSecurity.html" html page in the "MyFirst"folder with a text editor (such as NotePad++). And save the html to UTF-8 encoding. Add the following codes:
<!DOCTYPE html>
<html lang="en">
<head>
    <meta charset="UTF-8">
    <title></title>
    <style type="text/css"
 media="screen">
        #urlAdr{
            width:350px;
        }
    </style>
    <script src = 'libs/SuperMap.Include.js'></script>
</head>
<body>
    <div id="container">
    <p>iportal</p>
            <table>
                <tbody>
                <tr>
                    <td>Address:</td>
                    <td><input
 id="urlAdr" type="text"></td>
                </tr>
                </tbody>
            </table>
        <p>Login</p>
            <table>
                <tbody>
                <tr>
                    <td>Account:</td>
                    <td><input
 id="user" type="text"></td>
                </tr>
                <tr>
                    <td>Password:</td>
                    <td><input
 id="psw" type="password"></td>
                </tr>
                </tbody>
            </table>
            <input
 id="loginBtn" type="button" value="Login">
    </div>
    <script>
        var
 urlInput=document.getElementById("urlAdr");
        var
 type=SuperMap.Cloud.Security.IPROTAL;
        var
 security;
        //Login
        var
 loginBtn=document.getElementById("loginBtn"),
                user=document.getElementById("user"),
                psw=document.getElementById("psw");
        loginBtn.onclick=function(){
            if(security){
                security.destroy();
            }
            var
 url=urlInput.value;
            security=new
 SuperMap.Cloud.Security(type,url);
            var
 username=user.value;
            var
 password=psw.value;
            security.login(username,password,function(){
                alert("Login successfully!") ;
            },function(){
                alert("failed");
            });
        }
    </script>
</body>
</html>
In Example 1, we have already referred the resource file in the "MyFirst" folder, and copied the "MyFirst" folder to the directory of %SuperMap iPortal_HOME%/webapps.
You can also copy the "MyFirst" folder to other middlewares (for example, the Tomcat) or SuperMap iServer , or iPortal to publish the sample service.
Start SuperMap iPortal (If it is deploy on other middleware, you need to start the middleware). Input http://192.168.120.40:8090/MyFirst/iPortalSecurity.html (If it is other middleware, it should be the ip+port). Then input the iPortal address (It should be the same with the IP in address bar, namely, if the address bar is IP, here it should be the IP; if the address bar is localhost, here it should be localhost). For example, http://192.168.120.40:8090/iportal, input the iPortal user account and password. Click the login button, it will prompt "Login successfully!" As shown in the figure below:

After logging in successfully, use the same browser to input: http://192.168.120.40:8090/MyFirst/iPortal_MapViewer.html in the new window to run the "iPortal_MapViewer.html" in the Example 1. Input the iPortal address and map id, and click the Open Map to browse the map which requires access permission. As shown in the figure below:

Please refer to: iClient for JavaScript 8C ->"SuperMap.Cloud.Security" for more information.