Getting Started with iClient Classic

Feedback


SuperMap iClient Classic for JavaScript development process is as follows:

Ajax development process

Figure 1 SuperMap iClient Classic for JavaScript development process

Below we will show you how to use SuperMap iClient Classic for JavaScript to build a simple map application.

Step 1: Get Package

  1. Download the compressed package file -- SuperMap iClient Classic for JavaScript, then decompress it to local disk. Download address: http://support.supermap.com.cn/product/iClient.aspx
  2. The directory structure of it is as follows:
     

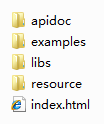
    Figure 2 SuperMap iClient Classic for JavaScript package structure

Step 2: Create HTML Page

Create a new folder on any location of the disk and rename it, here rename it "MyFirst"; Create a html page named "GettingStarted.html" with text editing tool (like NotePad++) in the folder, save the html page in UTF-8 encoding formating, add the following code:

HTML  
<!DOCTYPE HTML>
<html>
<body onload="init()">
    <!--div for displaying map-->
    <div id="map" style="position:absolute;left:0px;right:0px;width:800px;height:500px;" >             
    </div>    
</body>
</html>


Step 3: Reference Resource File

Two steps for the referencing:

  1. Copy the "resource" folder in Step1 to "MyFirst" folder;

  2. Copy the libs folder to "MyFirst" folder;

Of course, the libs and the resource folder can also be placed in other places, then need to modify the code in the next step in the relative path of the reference script.

Step 4: Add code to access the map service:

Add the following code between <html> and <body> to create the map.

JavaScript  
<head>   
    <title>SuperMap iClient for JavaScript:TiledDynamicRESTLayer</title>
    <!--The reference script-->
    <script src="./libs/SuperMap.Include.js"></script>
    <script type="text/javascript">
    //Declare variable smap, layer, url
    var map, layer,
    url = "http://localhost:8090/iserver/services/map-world/rest/maps/World";
     //Create Map Control
    function init() {
        map = new SuperMap.Map ("map");
        //Create dynamic tile REST layer, this layer shows the map published by iServer 8C,
        //"world" is the layer name,url is the service address,{transparent: true} sets the optional parameters
        layer = new SuperMap.Layer.TiledDynamicRESTLayer("World", url, 
        null, {maxResolution:"auto"});
        layer.events.on({"layerInitialized": addLayer});          
    }             
    function addLayer() {
        //Add Layer to Map
        map.addLayer(layer);
        //Display map with map.setCenter function
        map.setCenter(new SuperMap.LonLat(0, 0), 0);        
    }
    </script>
</head>

Step 5: Use the browser to run and view

Start SuperMap iserver Classic and run the GettingStarted.html file, view map data.

Figure 3 World Map visiting the SuperMap iServer services